A basic application with Amazon’s Selling Partner API

Since writing this post, I've switched over to using the Selling Partner API almost exclusively via my open-source PHP library. As a result, I'm no longer maintaining these Java instructions, so they may be out of date.
(This post continues where the last post, How to Access the Amazon Selling Partner API, left off. You'll need the setup from that post to follow along with this one.)
Now that all your various Amazon-related applications have been approved[[1]], we can start building an actual Selling Partner API program! We're going to create a basic app that shows you which regional Amazon marketplaces you're enrolled in.
Here are the steps:
- Create a new SP API application in Seller Central
- Self-authorize the application to run on your Seller Central account
- Install and configure all the software we need
- Write the SP API application
- Run it!
Let's jump into it.
Create a new SP API application in Seller Central
Before we can write a new Selling Partner API app, we need to tell Amazon that we're planning to do so. Log into Seller Central, go to Partner Network > Develop Apps, and click Add new application client. You'll land on a form that asks you for an app name and API type—I'm naming my app Example App, with API type SP API.
Now you'll be asked for your IAM ARN. This is the identifier for the AWS IAM user we created in the last post (it should look something like arn:aws:iam::012345678987:user/sp-api…and no, that's not my real info ;) Next, you need to select which SP API roles you want to grant your app. This controls which parts of the SP API the app has access to. Your list of available roles could be different than mine if you requested access to different roles to when you applied for a developer account, but I'm going to assume that (like me) you have access to all the roles that don't provide access to Personally Identifiable Information (PII). My list of available roles looks like this:
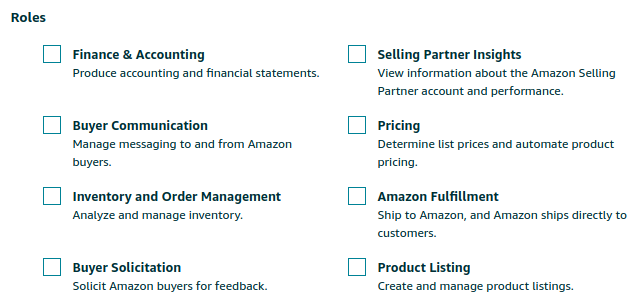
For this tutorial, the app only needs access to the Selling Partner Insights role, so check the corresponding box. You can leave the fields related to OAuth blank, since you'll be self-authorizing this app on your own Seller Central account.[[2]]
Step 1 complete!
Self-authorize the application to run on your Seller Central account
Now that you told Amazon about your new SP API app, you need to give that app access to your Seller Central account. Again, go to Partner Network > Develop Apps, then open the dropdown next to the Edit button for your app and select Authorize. This will bring you to the authorization page, where you can generate a Login with Amazon (LWA) refresh token. This token lasts a long time, and will be used to generate new API access tokens (which expire quickly). Save the LWA refresh token somewhere—you're going to need it! Note that from the Develop Apps page, you can click View to see your LWA credentials…you'll need those too.
Set up some required software
We need a few different things:
- The Java Development Kit (JDK), version 8 or later. I'm using Java 11.
- Two kinds of Java package management software: Maven and Gradle.
- A Java client library for the SP API, generated with Swagger Codegen v2.4.x.
For the purposes of this tutorial, I'm assuming that you use Eclipse.
Software installation and configuration
I'm on Manjaro (Linux), so the software installation process might be different on your machine. If so, look up how to install the JDK, Gradle, Maven, and Eclipse on your machine. This is how I do it:
$ sudo pacman -S jdk-openjdk eclipse mvn gradleSP API client library generation
We need Swagger to generate our Java library. The SP API specification is compatible with Swagger version 2.4.x (not v3). Download the Swagger jar:
$ wget \
    https://repo1.maven.org/maven2/io/swagger/swagger-codegen-cli/2.4.17/swagger-codegen-cli-2.4.17.jar \
    -O swagger-codegen-cli.jar
Now you have an executable jar named swagger-codegen-cli.jar in your current directory.
Next, clone the SP API models repository:
$ git clone git@github.com:amzn/selling-partner-api-models.gitNow you can generate the Java code for every possible SP API call. Here's the script I use to do that:
#!/bin/bash

cd selling-partner-api-models/

basePackage="com.amazon.sellingpartner"
models=(models/*/*)

# For every model in the models/ directory, and all subdirectories:
for model in "${models[@]}"
do
    modelName=$(echo $model | cut -d"/" -f3 | cut -d"." -f1)

    # Generate a client library
    # --input-spec $model           :: use the current model file
    # --lang java                   :: generate a Java library
    # --template-dir .../           :: use Amazon's premade Java template files
    # --output ../spapi             :: put the generated library in ../spapi
    # --invoker-package "..."       :: put the generated code in the given package
    # --api-package "..."           :: put the generated api code in the given package
    # --model-package "..."         :: put the generated model code in the given package
    # --group-id "..."              :: package metadata
    # --artifact-id "..."           :: package metadata
    # --additional-properties dateLibrary=java8 :: Use Java 8 date libraries
    java -jar ../swagger-codegen-cli.jar generate \
        --input-spec $model \
        --lang java \
        --template-dir clients/sellingpartner-api-aa-java/resources/swagger-codegen/templates \
        --output ../spapi \
        --invoker-package "$basePackage" \
        --api-package "$basePackage.api" \
        --model-package "$basePackage.model.$modelName" \
        --group-id "com.amazon" \
        --artifact-id "selling-partner-api" \
        --additional-properties dateLibrary=java8
done
Save that script as a file in your current directory called generate_api.sh, make it executable with chmod u+x ./generate_api.sh, and then run it with ./generate_api.sh. Once it's done running, there will be a Gradle project in ./spapi. All the generated code is in ./spapi/src/main/java/com/amazon/sellingpartner/.
This generated code relies on the authentication and authorization library that Amazon provides, so next we need to build that library.
$ cd selling-partner-api-models/clients/sellingpartner-api-aa-java
$ mvn package
$ cd ../../../spapi
Open ./build.gradle, and make two modifications. At the end of the else { ... } block, override the jar task so that we can generate a jar file that contains all its dependencies (a fat jar):
jar {
    from {
        configurations.compile.collect { it.isDirectory() ? it : zipTree(it) }
    }
}
Then add these lines to the beginning of the dependencies block at the bottom of the file:
compile files('../selling-partner-api-models/clients/sellingpartner-api-aa-java/target/sellingpartnerapi-aa-java-1.0-jar-with-dependencies.jar')
compile 'com.fasterxml.jackson.core:jackson-databind:2.12.0-rc1'
compile 'javax.annotation:javax.annotation-api:1.3.2'
We could technically stop here, and use the generated code directly by copying the whole package into another project, but that feels messy. Instead, we'll build the generated client library into a jar, and use that in our SP API application.
$ gradle install
# The SP API Gradle wrapper file has an old Gradle version, so we're updating it
$ gradle --version  # Note your Gradle version here
$ gradle wrapper --gradle-version=<your_gradle_version>  # Update the Gradle wrapper (./gradlew) version
$ ./gradlew build
Now the built SP API jar is at build/libs/selling-partner-api-1.0.0.jar (or something similar)! We're ready to start actually making an SP API application.
Write the actual application
Fire up Eclipse, and create a new Gradle project (File > New > Other, then search for Gradle). I'm going to name mine spapi-example. Click Next a couple times, hit Finish, and the project is all set.
Now we need to add the jar that we generated in the last section. Create a lib folder in the root of the project, and copy that selling-partner-api-1.0.0.jar file into it. Open build.gradle, and add implementation files('lib/selling-partner-api-1.0.0.jar') anywhere inside the dependencies { ... } block. Since this adds a new Gradle dependency, the Gradle project needs to be reloaded: right-click the project in the Package Explorer pane and click Gradle > Refresh Gradle Project.
If there are any autogenerated classes in your project, delete them. Then, in the sample.spapi package, create three classes: SPAPI, Config, and Main.
Main.java
package sample.spapi;

import java.util.List;

import com.amazon.sellingpartner.model.sellers.MarketplaceParticipation;

public class Main {
    public static void main(String[] args) {
        SPAPI spapi = new SPAPI();

        // Fetch all the marketplaces that your Seller Central account participates in
        List<MarketplaceParticipation> participations = spapi.getMarketplaceParticipations();
        // And print em all out!
        for (MarketplaceParticipation p : participations) {
            System.out.println(p.getMarketplace());
        }
    }
}
SPAPI.java
package sample.spapi;

import java.util.ArrayList;
import java.util.List;
import java.util.UUID;

import com.amazon.SellingPartnerAPIAA.AWSAuthenticationCredentials;
import com.amazon.SellingPartnerAPIAA.AWSAuthenticationCredentialsProvider;
import com.amazon.SellingPartnerAPIAA.LWAAuthorizationCredentials;
import com.amazon.sellingpartner.ApiException;
import com.amazon.sellingpartner.api.SellersApi;
import com.amazon.sellingpartner.model.sellers.GetMarketplaceParticipationsResponse;
import com.amazon.sellingpartner.model.sellers.MarketplaceParticipation;

public class SPAPI {
    protected Config config;
    protected SellersApi api;
    protected AWSAuthenticationCredentials awsAuthCreds;
    protected AWSAuthenticationCredentialsProvider awsAuthCredsProvider;
    protected LWAAuthorizationCredentials lwaAuthCreds;

    public SPAPI() {
        // Load the config information
        this.config = new Config();
        // Authenticate with Amazon
        this._authenticate();

        // Each application role corresponds to one or more ___Api classes. In this case, we're
        // using the SellersApi class, which maps to the Selling Partner Insights role.
        api = new SellersApi.Builder()
                .awsAuthenticationCredentials(this.awsAuthCreds)
                .lwaAuthorizationCredentials(this.lwaAuthCreds)
                .endpoint(this.config.getSPAPIEndpoint())
                .build();
    }

    public List<MarketplaceParticipation> getMarketplaceParticipations() {
        GetMarketplaceParticipationsResponse res = null;
        // Many SP API operations can throw ApiExceptions, so you'll often need to handle them
        try {
            // You can find all the API endpoints in the docs (linked below). The operation name
            // for an endpoint is generally the same name as the name of the corresponding Java
            // method. Here are the docs for this call:
            // https://github.com/amzn/selling-partner-api-docs/blob/main/references/sellers-api/sellers.md#getmarketplaceparticipations
            res = api.getMarketplaceParticipations();
        } catch (ApiException e) {
            System.err.println("Error while trying to fetch marketplace participations: ");
            e.printStackTrace();
        }

        List<MarketplaceParticipation> data = new ArrayList<MarketplaceParticipation>();
        if (res != null && res.getErrors() == null) {
            data = res.getPayload();
        }

        return data;
    }

    private void _authenticate() {
        // Configure AWS credentials
        awsAuthCreds = AWSAuthenticationCredentials.builder()
                .accessKeyId(this.config.getAwsAccessKeyId())
                .secretKey(this.config.getAwsSecretKey())
                .region(this.config.getAwsRegion())
                .build();

        // Configure LWA credentials
        lwaAuthCreds = LWAAuthorizationCredentials.builder()
                .clientId(this.config.getLwaClientId())
                .clientSecret(this.config.getLwaClientSecret())
                .refreshToken(this.config.getLwaRefreshToken())
                .endpoint(this.config.getLwaAuthEndpoint())
                .build();
    }
}
Config.java
package sample.spapi;

import java.io.IOException;
import java.io.InputStream;
import java.util.ArrayList;
import java.util.Arrays;
import java.util.List;
import java.util.Properties;

public class Config {
    private Properties props;

    public Config() {
        Properties props = new Properties();
        InputStream in = Config.class
            .getClassLoader()
            .getResourceAsStream("amazon.properties");
        try {
            props.load(in);
            in.close();
            this.props = props;
        } catch (IOException e) {
            System.err.println("Error while reading in amazon.properties: ");
            e.printStackTrace();
        }
    }

    public Properties getProps() {
        return props;
    }

    private String getProp(String propName) {
        return props.getProperty(propName);
    }

    public String getAwsAccessKeyId() {
        return getProp("aws.accessKeyId");
    }
    public String getAwsSecretKey() {
        return getProp("aws.secretKey");
    }
    public String getAwsRegion() {
        return getProp("aws.region");
    }
    public String getLwaAuthEndpoint() {
        return getProp("lwa.authEndpoint");
    }
    public String getLwaClientId() {
        return getProp("lwa.clientId");
    }
    public String getLwaClientSecret() {
        return getProp("lwa.clientSecret");
    }
    public String getLwaRefreshToken() {
        return getProp("lwa.refreshToken");
    }
    public String getSPAPIEndpoint() {
        return getProp("spapi.endpoint");
    }
    public List<String> getSPAPIMarketplaceIds() {
        String rawProp = getProp("spapi.marketplaceIds");
        return new ArrayList<String>(Arrays.asList(rawProp));
    }
}
You also need an amazon.properties file in src/main/resources/ with all your account-specific configuration information. Here's a template for that file:
aws.accessKeyId =
aws.secretKey =
aws.region = us-east-1

lwa.authEndpoint = https://api.amazon.com/auth/o2/token
lwa.clientId =
lwa.clientSecret =
lwa.refreshToken =
spapi.endpoint = https://sellingpartnerapi-na.amazon.com
spapi.marketplaceIds = ATVPDKIKX0DER  # North American market
Fill in the missing AWS information with the credentials you received after completing the instructions in my last post. The AWS access key and secret key are in a CSV that AWS prompted you to download when you created your IAM user. The LWA credentials can be found on the Partner Network > Develop Apps page on Seller Central. You already generated a LWA refresh token in the second step of this post—time to use it!
Run it!
And that's it! Run the Main class, and…drumroll please…you should get some output similar to this (you might get a different number of marketplaces, depending on your Seller Central account):
class Marketplace {
    id: A1AM78C64UM0Y8
    name: Amazon.com.mx
    countryCode: MX
    defaultCurrencyCode: MXN
    defaultLanguageCode: es_MX
    domainName: www.amazon.com.mx
}
class Marketplace {
    id: A2EUQ1WTGCTBG2
    name: Amazon.ca
    countryCode: CA
    defaultCurrencyCode: CAD
    defaultLanguageCode: en_CA
    domainName: www.amazon.ca
}
class Marketplace {
    id: ATVPDKIKX0DER
    name: Amazon.com
    countryCode: US
    defaultCurrencyCode: USD
    defaultLanguageCode: en_US
    domainName: www.amazon.com
}
Congratulations! You've successfully run your first SP API application.
Next time, I'll explain how to write an SP API application that can be listed on the Marketplace App Store so that other sellers can install it. Subscribe to get the post right in your inbox!
(I help Amazon sellers automate business processes using the Selling Partner API—if you’re interested in upgrading your selling infrastructure, shoot me an email at jesse@jesseevers.com.)
[[1]]: If you got rejected, feel free to email me. I'm happy to try to help you figure it out.
[[2]]: This means no one else will be able to install your app on their own Seller Central account. App authorization with OAuth will be covered in the next post.
Changelog
- 6/27/2022: Added disclaimer that I'm no longer maintaining these instructions.
- 11/18/2021: Updated generation script to place Java model files in separate directories based on their JSON models, to prevent different Java models with the same name from overwriting each other.
- 9/15/2021: Updated “Apps & Services” to “Partner Network” when referring to Seller Central nav option
- 8/20/2021: Removed info about issues with FBA Inbound OpenAPI tags, since it has been fixed.
- 12/28/2020: Switched from using an IAM role for authentication to using an IAM user, which removes the need for an STS token.